
Lowering a car suspension is perhaps one of the most common modifications anyone can make on a vehicle. A lowered suspension typically helps increase the aesthetic of a car. It can also increase handling performance.
When learning how to lower a car suspension, you will discover various ways to achieve this. However, we will highlight the most popular way of suspension lowering: using a lowering kit on cars with a leaf spring suspension.
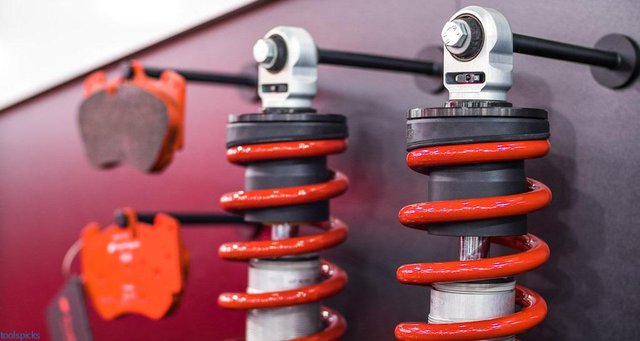
How to Lower a Car Suspension: Using a Lowering Kit With Lowering Springs
Numerous cars, particularly compact vehicles, employ coil springs suspensions. Lowering these vehicles means replacing the OEM stock coil springs with smaller ones that lower the car than usual when at rest.
Generally, these shorter lowering springs lower the ride height and provide a more responsive and sporty feel due to their stiffer design.
Interested in placing a Dodge Cummins engine in your car? Here is everything you should know.
Materials Needed for Suspension Lowering
- Air impact gun
- Air compressor
- Jack
- Jack stands
- Rudimentary set of hand tools
- A new set of lowering springs
- Strut spring compressor
- Socket set
- Tire chocks or Woodblocks
Steps to Take During Height Adjustment
The first step requires you to raise the front section of the vehicle.
Lift the front end of your car off the ground, securing it with jack stands. You should place tire chocks or word blocks near the rear tires to stop the vehicle from moving. You can secure your vehicle by using the parking brake as well.
Loosen the Lug Nuts
You can use an air impact gun and the right size socket to loosen the tire’s lug nuts. Removing the lug nuts can help you with the next step, removing the wheel.
Take the Car’s Front Strut Assembly Off
This process requires you to remove the bolts that secure the front strut assembly to the car. You can find the bolts at the bottom and the top. They can be removed using a ratchet, wrenches, or appropriate sockets.
While each vehicle might have its own strut design, most struts are typically held by 3 bolts at the top and 2 at the bottom. You can access the top bolts by lifting the bonnet of the vehicle. This process provides you with the required clearance to loosen the bolts.
Once all the bolts are loosened and removed, the strut assembly should be free to come off.
Compress the Strut Spring Before Removing It
When you remove the strut assembly from the vehicle, your next step should be to compress the strut coil spring using a strut spring compressor. Doing this helps to release tension between the upper strut mount and the spring.
The best way to do this is to compress the strut spring continuously in tiny increments, switching back and forth between both sides. You should do this until sufficient tension has been relieved from the strut spring. Only then can you remove the upper strut mount safely.
Uninstall the Compressed Coil Spring
Once the coil spring is sufficiently compressed, you can turn the compressed air on and use the air impact gun, plus a socket to detach the top nuts that secure the strut assembly to the strut mount.
When the top nut is removed, you should be able to pull the upper strut mount off and safely detach the compressed coil spring from its housing on the strut assembly.
Installing the New Car Suspension

This process requires you to pay close attention to how the lowering springs are placed on the strut perch. If they are placed incorrectly, the holes are unlikely to line up when installing these lowering springs onto the strut assembly.
Do not use the stock rubber spring seats, as the new car suspension system should come with its own set of rubber spring seats.
Not sure which struts to use? Read our Sensen Struts review.
Put the Upper Strut Mount Back
This process requires you to replace the upper strut mount back onto the car’s spring assembly. It should be placed just above the newly installed coil spring.
Depending on how lower the new shorter springs are, it might be necessary to compress the spring once more before you can reinstall the nut. Should this be the case, all you have to do is compress the spring until it enables you to install the nut.
Once done, turn the nut for a couple of threads before using the air impact gun to tighten it.
Reinstating the Strut Assembly
This process requires you to reinstall the strut assembly onto the vehicle. Only after reassembling the strut assembling using the new lowering springs can you place the strut assembly onto the car.
You will need to use the removal procedure in reverse order to do this. One tip to remember when reinstalling is that it is a lot easier to first place the bottom bolts in. this helps to support the strut before installing the rest of the bolts to secure the strut to the car.
Lower the Opposite Side of the Car
Once you have reinstalled the strut onto the car, you can place the wheel back and tighten the lug nuts. You can then move to conduct the same procedure on the other side’s strut assembly.
Lower the Front End and Raise the Back End
Once you have changed your suspension system in the front, you should do the same for the rear using the same process.
In most cars, the rear coil springs are quite similar, and most times, they are a lot easier to replace. You need to raise your car sufficiently high to release tension, enabling you to remove the spring by hand.
Conclusion
As you can see, learning how to lower a car suspension is an easy process; even changing the entire suspension system is something just about anyone can do. The key to this procedure is to have all the necessary tools nearby.
Furthermore, if you are unsure of your skills, you can always ask a friend to help you out or leave the entire process up to a professional.