
There is a lot of dirt, debris, lubricant spills, and all other forms of gunk that get a free ride in the engine bay because we don’t pay as much attention to its cleanliness as we do the rest of the car. This out of sight, out of mind approach is unfortunately not sustainable in the long run.
Accumulation of this gunk leads to corrosion and will eventually drag your engine down, affect the steering and suspension, and potentially even cause an engine fire. Popping that hood and giving the engine bay a facelift is much more than a vanity project, it makes the car safer.
It will seem scary and overwhelming at first, especially for the risk-averse, until you get the hang of it. We are here to show you how easy and affordable it is to wash the entire compartment and uncover the hidden beauty of the engine bay with basic ingredients like an engine cleaner spray.
Doing it yourself comes with a sense of pride and you will find that you know more about your car and can detect faults faster. You also save money in the process, and it will only take a paltry 20 to 45 minutes to complete, depending on how dirty the engine is.
What You Need
Our list of requirements is fully exhaustive as our goal is to make the process as smooth as can be. Some of the items listed are interchangeable and you are always free to improvise if you can conjure up alternatives. Here goes:
- An environmentally friendly engine cleaner spray or degreaser
- Protectant with its applicator
- Pieces of cloth or rags to work in the degreaser
- 3 brushes; a synthetic one, a soft bristle one, and a lug nut brush (can be replaced by a toothbrush)
- Microfiber towels
- Plastic trash bags and/or sheets of tin foil to shield electronic components from water
- Electrical tape or rubber bands to secure the trash bags and/or tin foils in place
- A pair of gloves and goggles
- Pressurized water sprayer with an adjustable nozzle or a garden hose
- An air blower or cans of compressed air
Which Engine Cleaner Spray Is Best for Your Car’s Engine?
It is tempting to use heavy-duty soaps, petrol-based cleaners, and solvents like kerosene to clean out the engine as they will loosen the gunk faster. Their composition is harsh however and they will take out more than the dirt they were assigned. Sometimes they even eat through the wax and painted surfaces.
They need to be completely wiped off soon after application, which is not always possible, considering some of the engine bay surfaces are hard to reach. The plastic, vinyl, and rubber parts under the hood may fade prematurely and become brittle.
You should look for milder solutions that will also protect your engine bay as they handle the dirt. The WD-40 Specialist Industrial-Strength Cleaner and Degreaser for example is a water-based, non-flammable, non-aerosol bio-solvent formula. It is powerful enough to tackle the engine grease under the hood yet safe for sensitive surfaces. It has corrosion inhibitors that will protect your engine components against flash rust.
![WD-40 Specialist Cleaner & Degreaser, 24 OZ [Non-Aerosol Trigger]](https://toolspicks.com/wp-content/uploads/2022/12/41XIr8T9vvL._SL500_.webp)
Prepping and Precautionary Measures
Gearing Up
The task is simple and low risk, but the cleaning product can be toxic. Avoid getting the engine cleaner spray or any of the soaps, waxes, shines, detailers, or engine grime in your mouth, eyes, nose, or open wounds.
Wear your gloves and goggles so you can work without worrying about them. Clothes with soft textures are preferred so you don’t scratch the car unintentionally. The metal rivets in jeans for instance might scratch the paint as you work.
Preventing Water Damage
While the electrical components under the hood were designed to resist moisture damage, you can never be too sure they will hold up against the direct impact of water, especially for older cars. The parts might also be defective and prone to water damage so you should exercise caution. All exposed electric connections should be covered in a plastic bag or tin foil, so should all the exposed electric components.
Some of the potential trouble areas include the computer box, battery terminals, fuse box, distributor, ignition coils, tranny belt, and so on. Note that some water-related issues will not be visible initially and might take days, or even months to become apparent.
The airbox intakes should also be covered with a plastic bag so you don’t accidentally flood them with water. So should the exposed fans and belts.
We highly recommend that you consult the manufacturer’s or owner’s manual of your car for an outlay of the electrical components and their connections before you begin, especially if it’s your first time cleaning the engine bay. The hoods are built differently for various models of vehicles, some even have enhancements that don’t come with the stock engine. You will be better placed to plan your approach with the knowledge of everything that can be affected by water.
Cleaning the Engine Bay
It is good practice when dealing with old vehicles to disconnect the battery terminals as a precautionary procedure before washing the engine bay. If you do this in most modern cars, you might disable some operational features which will force you to seek a system reset at the dealership. The decision is pegged on the specific car you are dealing with.
Let the engine cool down sufficiently before you begin the process, otherwise, it will produce steam which might scald you, crack plastics and corrode wires. A slightly warm engine is however not too bad and aids the process by shifting the more concentrated dirt buildup faster.
- Begin by using the blower to get rid of dust and loose dirt. Alternatively, or concurrently you can use the soft nylon brush to brush off the parts that are within its reach
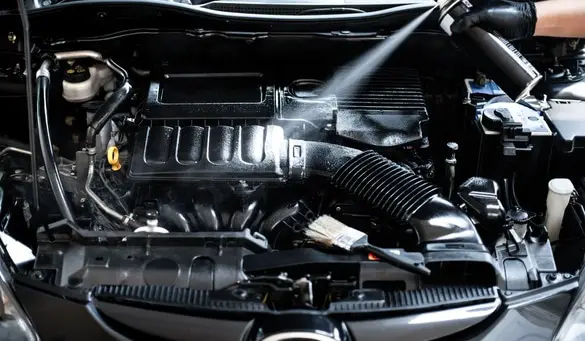
- Spray the engine cleaner spray across the entire engine bay, including the underside of the open hood, paying more attention to areas where the dirt has caked and where there is grease and carbon accumulation (don’t let any of the degreaser get on your belts)
- Let the solution sit for 3 to 5 minutes so it can work its magic. Don’t let it dry on the surface because it will stain it.
- Agitate the stubborn bits with the small brush or a rug; this allows you to get to the more confined areas which harbor the most stubborn gunk
- Spray water lightly all over the engine bay, starting from the top to rinse away the loose dirt and other contaminants. Adjust the spray nozzle so that the stream of water is less concentrated and gentle. This also makes it easier to control where the water goes.
- Isolate the areas that still have visible gunk and spot treat them before rinsing again
- Use a clean set of the absorbent microfiber towels to dry the engine bay starting from the hood going downwards
- Combine this with a blower or compressed air to draw out any residual moisture and remove any pools of water that are hard to access using the towel
- Remove the plastic bags and/or tin foil covers so you can clean these sensitive areas and wipe underneath to confirm there was no penetration of water.
- Use the detailer to clean them instead of the degreaser as you can’t rinse these bits and the degreaser will eat into the material if left on it indefinitely. Spray the detailer on the towel and wipe them carefully and gently.
- Spray the detailer on the rest of the clean engine bay and apply protectant to the vinyl, plastic, or rubber parts to restore their sheen and prevent discoloration or fading. This bit also prevents water staining on both composite materials and painted areas.
- Avoid getting a protectant or detailer on any of the moving mechanical parts like belts and fans as their efficiency will be compromised.
- Start the engine; this provides an opportunity to confirm everything is working as well as to dry the engine using its own heat.